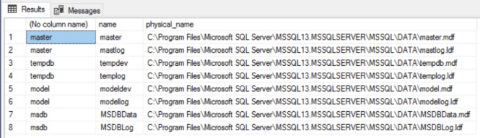
When creating an SQL Server environment using the Azure template, and after running the following query, it is observed that the system databases will be located on the OS partition. For reasons of performance and for example to avoid that the TEMPDB causes a server outage, these must be moved to alternate locations before we start using the server.
USE [master]
GO
SELECT DB_NAME(database_id), name, physical_name
FROM sys.master_files
WHERE database_id <= 4;
We shall be moving the databases in the following order:
- tempdb
- msdb and model
- master
Moving the TEMPDB database
First we have to identify the target location, then execute the script that will move the existing files to the new location, then create additional files as recommended by Microsoft.In the case of Azure, and since the tempdb database is recreated every time the server is rebooted (or the service restarted) we shall be using the temporary storage provisioned with the VM. This storage is ideal for this type of databases, not only because of the reason mentioned, but also because in Azure this storage is composed of SSD storage attached directly to the Hypervisor - note that in the case of the other disks (including the OS disk) there is a slight overhead since communication happens over HTTP. More detail can be found in Azure technical documentation.
The temporary disk will also store the OS Swap File however there should be more than sufficient storage available to host the tempdb database. Although it might appear logical and simpler to store the tempdb file in the root of the drive, following testing it was discovered that when the SQL Server process is creating the files, permissions on the root partition cause a delay which results in the service availability. Creating the files in a sub-folder does not cause these delays.
Of course, since the drive is (or can be) formatted every time the server is rebooted, any folder structure would be removed. A solution to that is to create a Windows Scheduled Task that executes a PowerShell command to create the folder structure. All the code required for this process follows below:
Create Scheduled Task using PowerShell
[string]$SQLInstanceTempDir    = "D:\Data"; # Directories for Database Engine TempDB files.
[string]$SQLInstanceTempLogDir = "D:\Data"; # Directory for the Database Engine TempDB log files.
[string]$ScheduledTaskName = "Create Folder Structure for TEMPDB";
# create scheduled task that will fire on startup to check and create the $SQLInstanceTempDir and $SQLInstanceTempLogDir folders
"{0} : Create Scheduled Task to create TempDB folder structure on startup" -f $(Get-Date -Format "yyyy-MM-dd HH:mm:ss");
$ScheduledTaskActions = @(); # array to store multiple ScheduledTaskAction
$ScheduledTaskActions += New-ScheduledTaskAction -Execute "powershell.exe" -Argument "-NoLogo -Command ""New-Item '$SQLInstanceTempDir' -ItemType Directory -ErrorAction Ignore""";
# the second step is only necessary if the TEMPDB LOG folder is different
if ($SQLInstanceTempLogDir -ne $SQLInstanceTempDir) {
    $ScheduledTaskActions += New-ScheduledTaskAction -Execute "powershell.exe" -Argument "-NoLogo -Command ""New-Item '$SQLInstanceTempLogDir' -ItemType Directory -ErrorAction Ignore""";
}

$ScheduledTaskTriggers = @(); # array to store multiple ScheduledTaskTrigger
$ScheduledTaskTriggers += New-ScheduledTaskTrigger -AtStartup;

$ScheduledTaskPrincipal = New-ScheduledTaskPrincipal -UserID "NT AUTHORITY\SYSTEM" -LogonType ServiceAccount -RunLevel Highest;
$ScheduledTaskSettingsSet = New-ScheduledTaskSettingsSet;
$ScheduledTask = New-ScheduledTask -Action $ScheduledTaskActions -Principal $ScheduledTaskPrincipal -Trigger $ScheduledTaskTriggers -Settings $ScheduledTaskSettingsSet;
Register-ScheduledTask -TaskName $ScheduledTaskName -InputObject $ScheduledTask | Out-Null;

Start-ScheduledTask -TaskName $ScheduledTaskName
Open Windows Task Scheduler and run the job to verify it for correctness. The folder structure should have been created in the path specified.
Now that the destination folder exists we can move the existing database files.
Change location of the current tempdb files
USE [master];
GO
ALTER DATABASE [tempdb] MODIFY FILE (NAME = tempdev, FILENAME = 'D:\Data\tempdb.mdf', SIZE = 72MB);
GO
ALTER DATABASE [tempdb] MODIFY FILE (NAME = templog, FILENAME = 'D:\Data\templog.ldf', SIZE = 72MB);
GO
After execution the following output is observed:
The file "tempdev" has been modified in the system catalog. The new path will be used the next time the database is started.
The file "templog" has been modified in the system catalog. The new path will be used the next time the database is started.
As the output message suggests, we do not have to bother with moving the existing files since they will be recreated when the service (or server) restarts, however we’d have to make sure that the old file have been deleted - if not just delete them manually.
In this example, the tempdb database has been configured with a single data file however the server has been allocated 8 Virtual CPUs.

Microsoft recommends that we create a data file for each CPU or vCPU, up to a maximum of 8 files, which is what we’re going to do next.
Create additional tempdb data files
USE [master]
GO
ALTER DATABASE [tempdb] ADD FILE ( NAME = N'tempdev1', FILENAME = N'D:\Data\tempdev1.ndf' , SIZE = 72MB , FILEGROWTH = 64MB )
GO
ALTER DATABASE [tempdb] ADD FILE ( NAME = N'tempdev2', FILENAME = N'D:\Data\tempdev2.ndf' , SIZE = 72MB , FILEGROWTH = 64MB )
GO
ALTER DATABASE [tempdb] ADD FILE ( NAME = N'tempdev3', FILENAME = N'D:\Data\tempdev3.ndf' , SIZE = 72MB , FILEGROWTH = 64MB )
GO
ALTER DATABASE [tempdb] ADD FILE ( NAME = N'tempdev4', FILENAME = N'D:\Data\tempdev4.ndf' , SIZE = 72MB , FILEGROWTH = 64MB )
GO
ALTER DATABASE [tempdb] ADD FILE ( NAME = N'tempdev5', FILENAME = N'D:\Data\tempdev5.ndf' , SIZE = 72MB , FILEGROWTH = 64MB )
GO
ALTER DATABASE [tempdb] ADD FILE ( NAME = N'tempdev6', FILENAME = N'D:\Data\tempdev6.ndf' , SIZE = 72MB , FILEGROWTH = 64MB )
GO
ALTER DATABASE [tempdb] ADD FILE ( NAME = N'tempdev7', FILENAME = N'D:\Data\tempdev7.ndf' , SIZE = 72MB , FILEGROWTH = 64MB )
GO
The command should execute successfully. Note that the initial file sizes and the file growth (SIZE and FILEGROWTH parameters) should all be equal. The reason behind this is related to performance - SQL Server fills each file in a FILEGROUP in a round-robin fashion, attempting to keep all files at the same size.
At this point we could restart the service and see that the service would have created all tempdb database files in the new location, however to reduce the number of restarts we shall be moving the other databases’ files and restart once.
Moving the MSDB and MODEL databases
The code to move these databases is structured like that used above, with the difference being the file names and paths. In our case we’ll be moving the database files to the E:\Data folder - once again, not in the root of the drive.
Change location of the MODEL and MSDB database files
USE [master];
GO
ALTER DATABASE [model] MODIFY FILE (NAME = modeldev, FILENAME = 'E:\Data\model.mdf');
GO
ALTER DATABASE [model] MODIFY FILE (NAME = modellog, FILENAME = 'E:\Data\modellog.ldf');
GO
ALTER DATABASE [msdb] MODIFY FILE (NAME = MSDBData, FILENAME = 'E:\Data\MSDBData.mdf');
GO
ALTER DATABASE [msdb] MODIFY FILE (NAME = MSDBLog, FILENAME = 'E:\Data\MSDBLog.ldf');
GO
After execution the following output is observed:
The file "modeldev" has been modified in the system catalog. The new path will be used the next time the database is started.
The file "modellog" has been modified in the system catalog. The new path will be used the next time the database is started.
The file "MSDBData" has been modified in the system catalog. The new path will be used the next time the database is started.
The file "MSDBLog" has been modified in the system catalog. The new path will be used the next time the database is started.
That’s it. Onto the next.
Moving the MASTER database
This is a little trickier and has to be carried out with more caution. And this is where your service downtime will start.
- Start SQL Server Configuration Manager;
- Click on SQL Server Services;
- Right-click on the SQL Server (MSSQLSERVER) service and click on the Properties item;
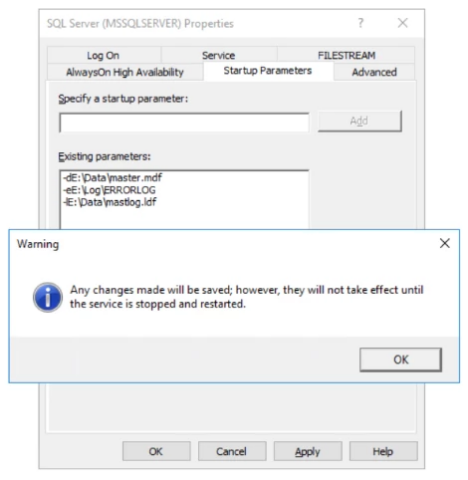
- Click on the Startup Parameters tab;
- Click on the line starting with a “-d” (representing the master database data file location) and change the path to the new location;
- Click on the Update button;
- Click on the line starting with a “-l” (representing the master database log file location) and change the path to the new location;
- Click on the Update button;
Side note: At this point it might be a good idea to move the location of the ERRORLOG files too.
- Create a “Log” folder in the same drive as the System Databases;
- Click on the line starting with a “-e” and change the path to the new location;
- Click on the Update button;
- Click on the Apply button, then OK.
We should now stop the SQL Server (MSSQLSERVER) service and move the database files whose file location attributes we have changed. This can be done using the robocopy utility, which is already present on the server.
Copy files for system databases
robocopy "C:\Program Files\Microsoft SQL Server\MSSQL13.MSSQLSERVER\MSSQL\DATA" "E:\Data" m*.*df /ZB
Once the files have been copied, the original files should be moved to an alternate location (DO NOT DELETE YET!) and the service/s started.
Should any errors be encountered, such as the one shown below, the appropriate troubleshooting approach should be undertaken.
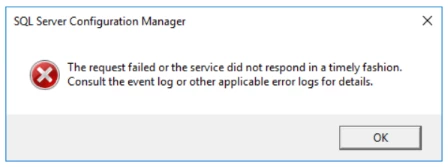
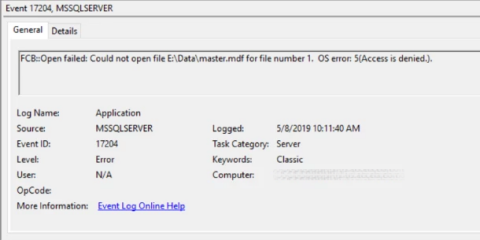
For the above error, the resolution was to grant FULL CONTROL on the new Data and Log folders created to store the system databases.
Once the permissions were corrected and the service launched, this started successfully.
Finally we can delete the old database files as well as checking that the old TEMPDB files have been deleted.
Moving the SQL Server Agent Log Path
Once we have moved all System Databases as well as the SQL Server ERRORLOG to an alternate drive, we should also change the SQL Server Agent log path. If the path is not updated, and the original folder deleted (because it would be unneeded at this point) SQL Server Agent might fail to start.
This is relatively simple and can be done using below code:
Change SQL Server Agent Log Path
USE [msdb]
GO
EXEC dbo.sp_set_sqlagent_properties @errorlog_file=N'E:\Log\SQLAGENT.OUT'
GO
Once that final step is done it would be a good idea to restart the services. Quite possibly, the better approach would be to reboot the server to confirm that all the changes have been applied successfully and that all the affected services start automatically without any errors.